All car owners take care of their cars. Most of the attention has, of course, on the appearance, which is first striking. An important part of the flawless appearance is the bumper, without which it is simply indecent to leave, and a small dent is perceived by many as a personal grief.
Having a custom, tuning bumper is the dream of any owner. After all, an ordinary, serial model can be given an original appearance and cause admiring, envious glances of those around! As a rule, such bells and whistles are a very expensive pleasure, however, like buying a new bumper.
Try to make tuning your own bumper. To do this, you will need an inexpensive set of materials, a simple tool, some personal time, basic skills and, most importantly, desire.
Have you decided? - Choose one of the options and start work:
- tuning available factory;
- create a new, original from scratch.
Content
- 1 How it's done
- 2 Materials for work
- 3 Operating procedure
- 4 polystyrene bumper
- 5 Foam bumper
- 6 Instead of conclusion
How it's done
Tuning bumper using foam
Creating from scratch may require certain skills (which are quickly improved), accuracy, patience and time. Everything will have to be adjusted as accurately as possible to the size and fastenings, without critical gaps and skews. In the first version, everything is much simpler - we tune the bumper, slightly changing the shape and adding a number of new elements: a skirt, an air intake, etc., and leave the place of junction and fasteners for the relatives. We recommend making some sketches of a future masterpiece before starting work - it will be much easier to work with a visual image.
Materials for work
For tuning or creating a new bumper you can use such affordable and inexpensive materials:
- Styrofoam;
- polyurethane foam;
- fiberglass or fiberglass;
- polyester resin;
- technical clay;
- putty;
- paint and primer.
Attention! Тюнингуя do-it-yourself bumper, следует знать, что пенопласт, в отличие от монтажной пены, растворяется в полиэфирной смоле. Поэтому используя пену, можно накладывать смолу непосредственно на неё, а пенопласт необходимо защитить слоем технического пластилина.
Operating procedure
Making the layout of the bumper from foam
- Creating the necessary form of a suitable material;
- thorough surface preparation for resin application;
- laying a sufficient number of layers of fiberglass and resin;
- putty fiberglass and building new forms;
- grinding and leveling;
- surface primer;
- painting products.
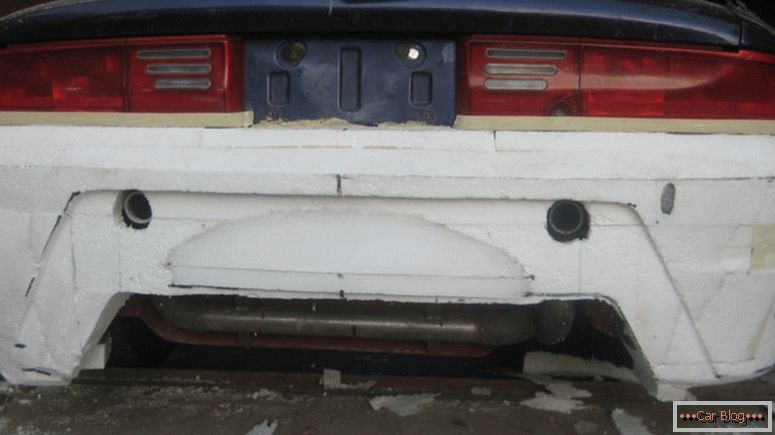
Polystyrene bumper
Polyurethane foam is a specific material, so it is not convenient for everyone to work with it. We buy the required number of sheets of foam and proceed to the process of creating blanks for the new bumper.
- Several sheets (usually 60-80 mm wide) are “knocked down” by liquid nails.
- After the glue dries, referring to the sketch, the marker fills the contours of the future bumper.
- With neat and precise movements of a sharp knife, cut off the excess. This stage will require attentiveness, patience and, naturally, a lot of time.
- We cover the workpiece with a protective coating of technical clay or 2-3 layers of putty.
- A well-dried disc is required to be thoroughly sanded with fine sandpaper.
- Apply several layers of resin and fiberglass and leave to dry.
- We carry out fair processing, priming and painting.
Glass can be replaced by a newspaper, if for any reason you can not use it. However, in this case, the surface must be plastered.
Fiberglass Plated Bumper Layout
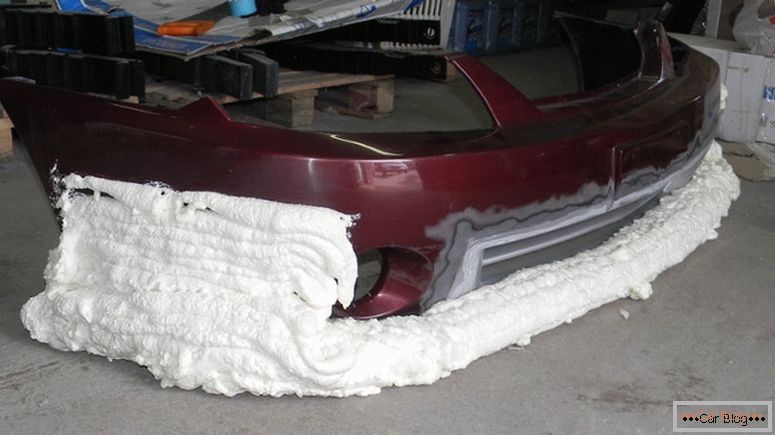
Foam bumper
The stages of creation are very similar:
- Carefully and slowly pour the mounting foam, forming the desired volume.
- We are waiting for drying, we fill the contour with a marker, and cut it out. It is very important to maintain symmetry and maintain gaps.
- We process and bring the disc, apply resin and fiberglass.
- We are waiting for drying, oshkurivaem, putty, primed and painted.
A warning: Hitting construction foam on a metal surface is harmful, so be sure to protect metal parts with, for example, penofol.
Несложно догадаться, как сделать do-it-yourself bumper ещё одним способом — комбинированным. Используйте пену и пенопласт вместе. Этапы изготовления аналогичны предыдущим. Этот способ лучше всего подходит более опытному человеку, который ранее работал с обоими материалами.
Instead of conclusion
Make others admire your car, create a new image with your own hands. Embody the fruits of your imagination in an exclusive and extraordinary bumper. It can greatly affect the appearance, style and character of your car. Change it depending on the season or mood. Try it, it's easy! Do not limit the flight of fantasy - the size and shape can be any!
See also: DVR with radar detector: which model is better to buy

