Pulse speed sensor, among motorists better known as the Hall sensor, it is very simple in design, but very important element of the ignition system. On modern cars, it replaces the classic contact breaker. On engines with a classic ignition system, the sensor is placed in the distributor housing. Any malfunction of the sensor can lead to failures in the engine, and in some cases to a complete stop, or the inability to start.
Content
- 1 Principle of action
- 2 Reasons for checking the Hall sensor
- 3 Do-it-yourself Hall Sensor Check
Principle of action
The principle of operation of the Hall sensor is very simple. It is based on the Hall effect of the same name, which consists in the fact that when a transverse magnetic field is applied to a loaded semiconductor, an electric field is generated. In this case, the voltage of the current passing through the semiconductor is changed by a value from 0.4 to 3 Volts. If the source of the magnetic field is periodically shielded, the sensor will operate in a pulsed mode. The simplest Hall sensor is equipped with a circular screen with slots, or ferromagnetic curtains, the number of which corresponds to the number of cylinders.
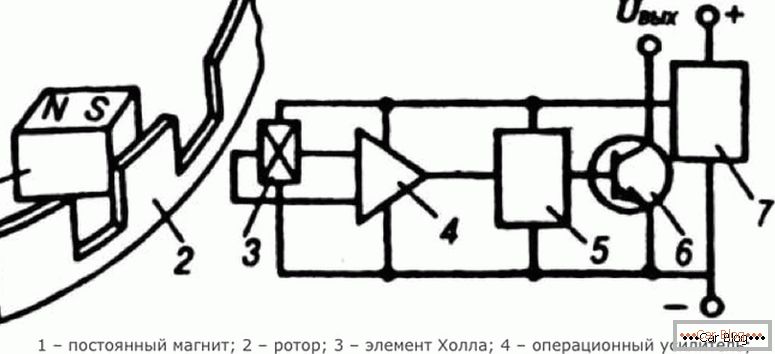
Schematic diagram of the operation of the Hall sensor
Reasons for checking the Hall sensor
There are several reasons why it is important for a car owner to know how to check a Hall sensor. After all, its faults most often lead to such external manifestations as:
- Sharp decrease in power;
- Difficult start;
- Interruptions in engine performance, accompanied by vibration;
- Sudden engine stop;
- Inability to run.
The first three causes occur when signals from the sensor arrive, but their output parameters deviate significantly from normal. In this case, verification is reduced to inspection of its attachment.
When loosening the fasteners, which often happens, by tightening it is necessary to ensure that the displaced sensor returns to its normal position. This is very relevant, because a poorly fixed sensor not only leads to the above negative points, but can also get serious mechanical damage to the curved rotating curtains. In case of significant damage to the sensor, the engine becomes impossible, since the pulses from it completely cease to flow.
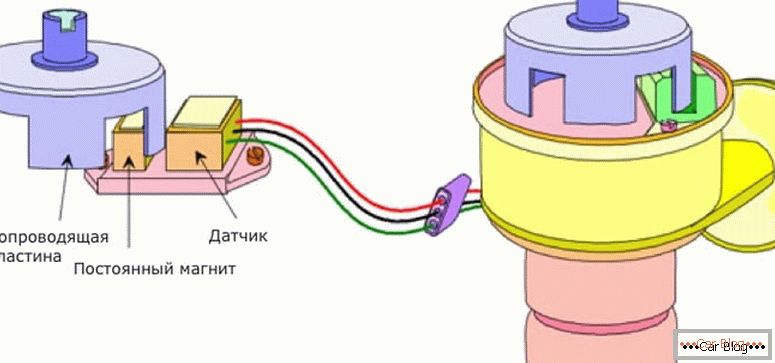
Visual representation of the operation of the Hall sensor
Other causes of failure can be severe overheating or shorting of the signal output. In the case when it is assumed similar, it is necessary to check the Hall sensor for malfunction.
See also: DIY immobilizer bypass when installing an alarmHall Sensor Check своими руками
How to check the Hall sensor наиболее лёгким и безотказным способом, догадаться нетрудно. Нужно просто поменять его на заведомо работоспособный. Возможно, такой найдётся у запасливого соседа по гаражу, либо он рискнёт позволить вам на время снять датчик со своего авто. Исчезновение «симптомов» при временной замене датчика однозначно свидетельствует о неисправности вашего.

Testing the Hall sensor with a voltmeter
If this is not possible, you can check the Hall sensor with a voltmeter. To do this, with the ignition on, you need to connect it to the output terminals of the sensor. Instrument readings should be in the range from 0.4 volts to a value not more than 3 volts other than the nominal one. If the device shows less than 0.4 V, this is a sure sign that the sensor needs replacing.
The verification of the Hall sensor can also be carried out by creating its simulator. After removing the plug from the distributor, with the ignition on, you need to connect the wires "3" and "6" on the switch with a wire. About the malfunction of the Hall sensor is eloquently indicated by the spark appeared at the moment of touching.
If the test gave negative results, it must be replaced.
The sensor is removed in the following order:
- Remove the distributor cover (distributor);
- Combine the first mark on the crankshaft pulley with a medium risk on the frontal timing case cover;
- Any way to notice the position of the slider;
- Remove the distributor fastener (wrench to "13");
- Using a light hammer, gently knock out the pin fixing the oil coupling;
- Remove the shaft and clutch together with the washer;
- Disconnect sensor terminals;
- Pull the regulator, and through the resulting gap to remove the Hall sensor.
Install the sensor in the reverse order.
And in conclusion, quite banal, but very useful advice: Be sure to buy and carry a spare sensor in the car. Believe me, the cost of its acquisition will pay off with a huge saving of nerves and time, if such a breakdown on the road suddenly happens.
Read also: Wires for lighting your own hands

