Drivers often use their vehicles not only during the day, but also at night. In this case, it is necessary to monitor the health of the light optical system. Each light can have an impact on driving safety. Due to dim light or lack of light on any side, road trouble may occur. Timely replacement of the low beam lamp usually takes place without much difficulty. It is enough to have detailed step by step instructions at hand.
Content
- 1 The need to replace the appliance
- 2 Important Factors
- 3 Replacement procedure
- 4 Causes of faults
The need to replace the appliance
Driving with faulty optics is prohibited by the current traffic regulations. This rule is enshrined in the List of faults that do not allow driving a vehicle in this state. If there is pollution on the surface of the lamp or it does not give out the indicators for luminous flux set by the manufacturer, then the driver has no right to drive such a vehicle.
A car with an inoperative lighting system is a threat on the road, not only for the driver, but also for other road users. This is due to the fact that the driver behind the wheel has a limited visibility of the road section, and this vehicle is not seen by the rest of the car owners and pedestrians. Problems can arise not only from the evening, but also in cloudy weather, and under other conditions of reduced visibility.
Since it is possible to replace the low beam bulb in the garage conditions independently, it is often the case that this operation is carried out simultaneously in both headlamps: right and left. This will allow you to choose light elements of the same power and the same type. Then the car on the road will not look "one-eyed", the light from both headlights will be approximately equal.
It is necessary to monitor the electric part of your vehicle in a similar way in cars of Asian origin and in models of the domestic auto industry. Нередко на форумах встречаются просьбы о помощи, в которых владельцы Приоры или Нивы интересуются, how to change the low beam bulb.
Important factors
In order for the procedure to pass without any complications, it is necessary to follow certain rules. They will help protect the car from negative undesirable consequences.
- The process of repairing light optics and other electrical equipment in any car needs to be started by turning off the power supply. Fold down the battery terminals. The battery can only be returned to its original working position with the ignition off.
- It is strictly forbidden to test the presence of a charge in a battery using a short circuit by checking for a spark. Devices connected at this time can fail completely or require costly repairs.
- Optical devices are protected from overload by fusible inserts (fuses). Do not exceed the manufacturer’s resistance or amperage values by installing substandard inserts. Also, do not put pieces of wire or paper clips instead.
- When replacing broken fuses, you must use plastic devices to remove them from the socket. Use for this purpose a screwdriver is not worth it, since it can lead to undesirable closure.
- It is not possible to open the terminals from a running engine. In such a situation, the voltage regulator almost always fails. Such an action leads to electrical breakdowns.
- Перед тем how to change the low beam bulbs, особенно галогенные, необходимо обеспечить чистоту их рабочей поверхности. В противном случае отпечатки пальцев впоследствии приводят к затемнению площади касания.
- It is recommended to use clean cotton gloves for working with lamps. If there is a touch to the glass surface, then it is cleaned with a clean cloth moistened with alcohol.
- Do not allow the failure of lamps and dipped beam. If a decrease in the luminous flux is detected, it is recommended to carry out a precautionary replacement so that the surprise does not suddenly find you on the road.
Observing the rules, you can be confident in the performance of the controlled electrical center.
Replacement procedure
When the light on one of the light bulbs disappears, the driver first of all tries to identify the reason for the lack of power supply to the headlight. To do this, you need to check the fuse box. It is installed in the Priore both in the cabin under the driver’s foot and in the traditional engine compartment.
-

- unscrew the plug
-
- We get the indicator lamp
-
- Snap lock
-
- Open the lid
-
- Unscrew the cartridge
-
- Change the lamp
-
- Checking the lamp
Otschelknuv cover panel, check the performance of the fuse link. You will need to remove it from the nest with tweezers. Usually it is under the cover. The fuse layout is indicated on the inside of the cover. Their value is also indicated there. Check whether the insert can be "on the light."
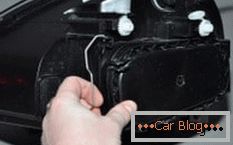
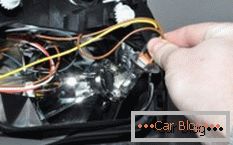
After visual inspection of the fuses, we proceed to identify the fault directly in the headlight itself. To do this, open the hood and remove the rubberized plug-boot from the back side of the repaired optical unit. After that, access to the desired area.
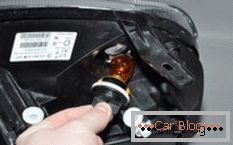
If you want to replace the lamp with a turn signal, then it is the easiest to access. It is enough to turn the cartridge closing it counterclockwise. The lamp will come out with it. Slightly naddav on it and scrolling until it stops, we get out of the cartridge. It is important to check the condition of the rubber sealing ring. It prevents moisture penetration into the work area.
Lamp type PY21W with yellow glass required. We put a new one in the cartridge and twist the block back.
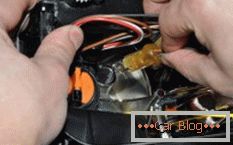
For other lamps, it is necessary to tilt the spring clip holding the cover. Reaching a hand is problematic, so you need to be careful not to get hurt.
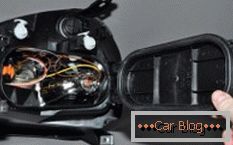
We dismantle the plastic cover, removing the hooks from the eyelets. Further access to the cartridge with the lamp daytime running lights. Unscrew the module counterclockwise. We take out the damaged lamp and change it to the purchased model H15. We return everything back.
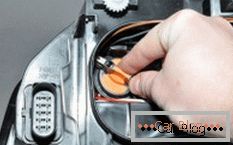
To remove the low beam lamp, release a few retaining springs. They hold the lamp in position. We take it out of the block. Two contacts are connected to the back side. We check the presence of oxidation on them, and if necessary we carry out a stripping. Turning the power from the cartridge. We put a new model of the illuminator H7. We return everything in reverse order.
At the last stage we control the state of the light node of the side lights. This is a small bulb like W5W. If necessary, we carry out the replacement.
Causes of faults
If the driver has to frequently change the lamp, it is important to eliminate the causes in such a situation, and not to deal with the consequences. The following factors may be responsible for the damage:
- malfunction of the voltage regulator in the generator, for example, his brushes are out of order;
- counterfeit lamps, so you should not save and buy cheap in an unknown place;
- extremely high current in the circuit;
- there were stains from touching the lamp with his hands;
- malfunctions with safety block.
At observance of all installation rules, the problem should not disturb the driver for several years. It must be remembered that if the unfair operation of the car becomes the cause of the accident, the driver may lose his insurance.


