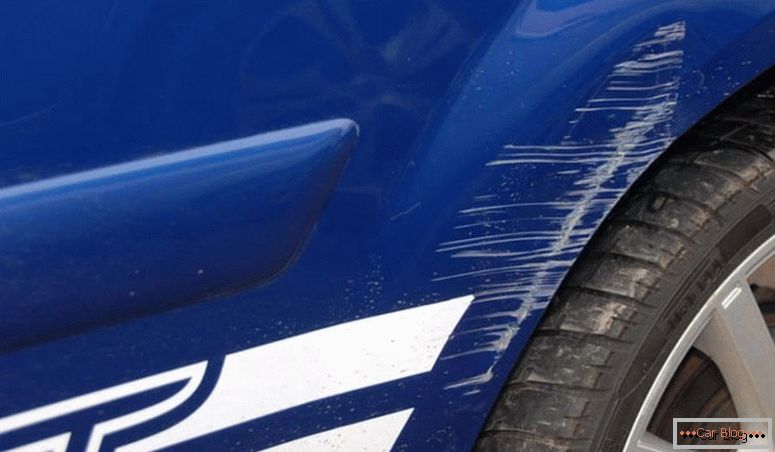
Во время эксплуатации авто, даже самый аккуратный водитель не застрахован от сколов и царапин. Эти мелкие неприятности появляются из-за отскакивающих камушков с дорожного полотна, веток и высокой сухой травы. Ситуация не из приятных, так как гравий не только вредит varnishокрасочному покрытию, но и оголяет заводскую грунтовку иногда до самого метала, где потом на его поврежденной структуре появляются очаги коррозии, ведущие к более плохим последствиям. Чтобы поправить ситуацию, вовсе не обязательно ехать в сервис и прибегать к перекрашиванию. В зависимости от степени повреждения, при наличии терпения можно провести локальный ремонт сколов на кузове автомобиля своими руками.
Car scratches
Damages are divided into three levels, their differences consist in the depth and area of damage. Scratches of the top layer of paint, chips to the level of the primer and damage to the metal. Each level requires its own approach. Vehicle body repair technology makes it possible to remove all damage without a trace. Innovative products for masking scratches quite a lot, they are all resistant to moisture, sunlight and temperature extremes. Find a means to eliminate the effects of aggressive environment in any auto shop.
Content
- 1 general information
- 2 Local ремонт сколов и царапин
- 3 Post-repair defects paintwork
general information
If you are interested in the question of how to remove the chips on the car body with your own hands, then before analyzing the repair process, you should familiarize yourself with some rules:
- review safety regulations prior to bodywork recovery. See how to properly prepare the surface, where to carry out the work, study the criteria for the selection of materials;
- inspect the surface and assess the degree of damage. Sometimes everything costs a cosmetic pencil or polish of the corresponding color;
- when choosing materials, it is not necessary to save; it is better to choose the compositions of well-known manufacturers, so the risk of purchasing a poor-quality product will be minimized;
Clearing cleaved
- Before buying a paint, it is necessary to determine the index of the paint with which the machine is covered. The number is indicated by the manufacturer, it can be found on the door pillar, in the trunk or under the hood in a black plate. The code is located, as a rule, below and begins with the designation C / TR (the main and interior color is Color / Trim). If the searches were not successful, then you can find the paint index by the VIN code through the ETKA program;
- You can always contact the experts who will analyze the color of the paint and help you choose the appropriate color. It is not necessary at this time to drive the car into service, just grab the lid of the matching paint tank with you;
- use and mix the purchased formulations strictly according to the instructions;
- materials for the work worth taking the same brand;
- use spotters for spot welding, polishing machines, and other devices;
- There are ready-made kits for work.
The sooner you get down to business, the less money for repairs will cost. Remember that a small chip size of just a few millimeters may increase several times a year, acquiring rust along the way.
Local ремонт сколов и царапин
Repair paintwork is divided into:
- Complex. Required when a large area of the car body is badly damaged.
- Local ремонт сколов и царапин на кузове автомобиля. Просто обновляет небольшой поврежденный участок, максимально сохраняя первичный varnishокрасочный слой. Появляются новые технологии, вместе с ними и совершенствуются методы борьбы с повреждениями. После проведения локального ремонта даже не видно перехода в цвете на месте дефекта.

Surface polishing
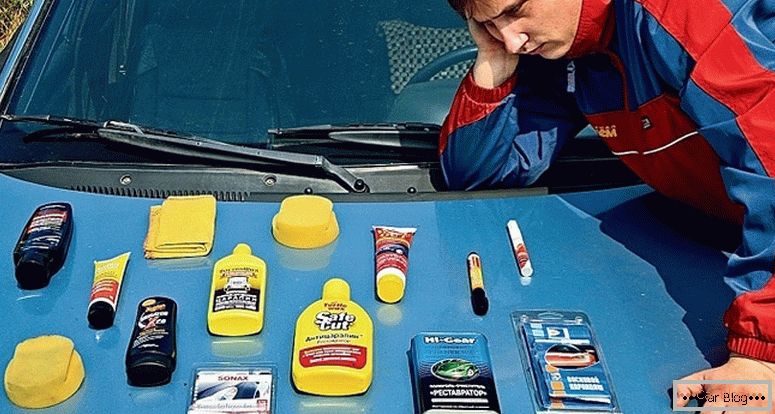
Materials required for work:
- degreaser;
- putty;
- primer;
- spray can or pencil;
- varnish;
- if you do not want to take everything individually, you can purchase ready repair kits фvarnishонов с кисточками.
Stages of work:
- Before carrying out repairs, it is necessary to prepare the room so that direct sunlight does not fall on the trains.
- Before starting the process it is recommended to spray water inside the room and close the doors - this will reduce some dust streams.
- Look carefully at the injured sites. Usually the beak and the front of the hood suffer. This is due to the fact that this part is "on the edge" of the car and takes most of the strikes during the movement of the vehicle.
- The vehicle must be pre-washed with the use of automotive detergents of the type of white spirit.
- For convenience of restoration, it is possible to dismantle a part with damage.
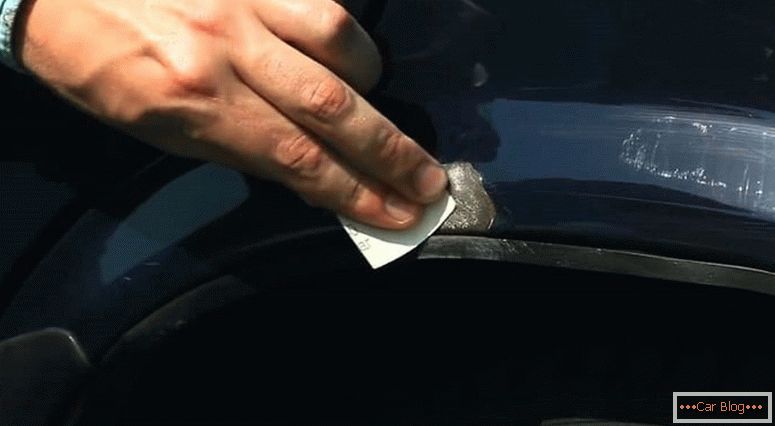
- After drying, the surface at the site of scratches should be cleaned with sanding paper and remove dust. First, it is trimmed with coarse-grained, and then fine, the main thing is not to overdo it. If there is rust, then it must be cleaned with a knife or needle file, and then treated with a chemical corrosion converter.
- Then, the site of exposure should be treated with a degreaser.
Means for eliminating chips and scratches
- Приступаем к грунтовке. Предварительно ее нужно развести по инструкции. Чаще всего primer попадается двухкомпонентной, где необходимо смешивать составы с соблюдением определенных пропорций. Изъян необходимо сровнять и просушить. Если требуется можно нанести несколько слоев с просушкой каждого. Когда primer нанесена неправильно, убрать ее можно при помощи бензина, если она не успела высохнуть.
- When the scratch is deep, you need to use a putty. Apply it with a rubber spatula.
- Go to the painting. If you use a can, then hold vertically. The distance between the surface and the sprayer is set by the paint manufacturer and prescribed on the spray can. When the paint is applied incorrectly, it is cleaned with a dry cloth. To achieve a smooth coating, it is possible with the help of several paint applications. Remember that every applied layer of paint must be dried. When applying paint with a brush, make sure that the droplets do not spread over the surrounding paintwork, evenly distribute them over the crater. Align the layer as clearly as possible around the edges to enhance the visual effect.
- В завершение наносим varnish, если это требуется. Можно пройтись восстановительной полиролью, которая придаст блеск и создает защитную пленку. Рекомендуется дать автомобилю постоять сутки, чтобы покрытие хорошо схватилось.
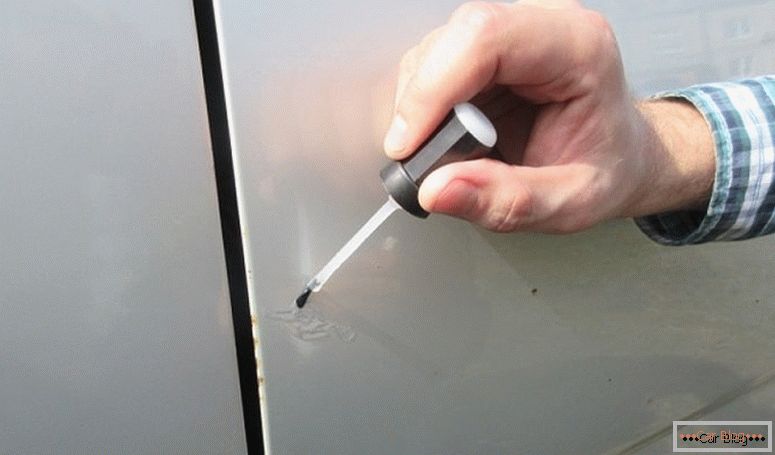
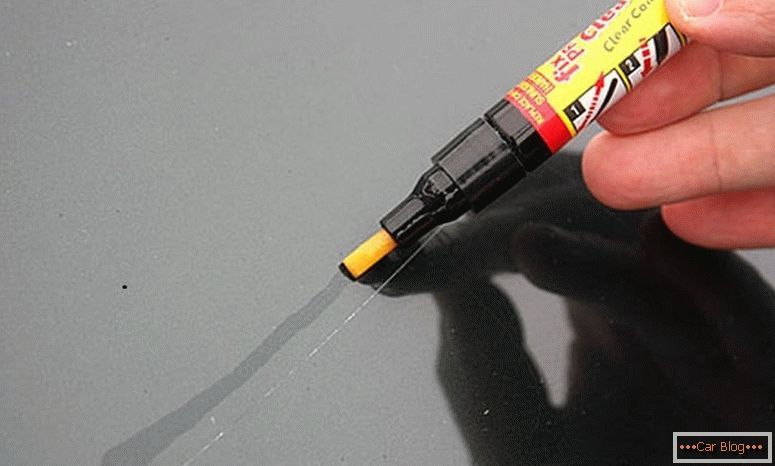
There are such means as "wax sticks" or "correctors", they can easily and quickly eliminate chips, where the ground is touched, however, they are not suitable for all cases. There are two types of these remedies:
- one fills the scratch with a wax compound, which then hardens and the scratch becomes invisible. The validity of such a composition is short, and the scratch itself is easily susceptible to corrosion. When you have cleaved chipping, you need to quickly remove excess material from a nearby surface;
- the second resembles a felt-tip pen with a helium texture. Interacting with air, the applied composition is polymerized. Although the pen creates a thin layer, the coating itself is durable. To choose the right color to the color of the car is not easy.
Restoration Pencil
Post-repair defects paintwork
If in time the removal of chips on the body you neglected the generally accepted and long-proven rules of painting techniques, then at the end of the work you will definitely encounter such consequences as
- opyl - when a new layer of paintwork is applied on the dry previous layer. Eliminated by grinding;
- dust settling. Так как полностью избавится помещение от пыли нереально, то исправляют пылевой дефект после полного высыхания varnishокрасочного покрытия, шлифуя верхний слоя varnishа;
- unevenly dried paint;
- bubbles appear after drying the paintwork, most often it is caused by the action of the solvent - or a fast-acting diluent was used. Also, the reaction could be accelerated if you were drying with a hair dryer. Bubbles are cleaned by grinding;
- peeling or shagreenspossibly due to a strong thick solution or poor viscosity of the paint. Shagreen can be eliminated by deep grinding and polishing;
- risks and grooves под varnishом, возникают после грубой шлифовки или использования только крупнозернистого абразива, который оставил глубокие следы. Исправить можно полировкой, если слой ЛКП достаточно толстый;
- the surface turned out with a matte effect. Возможно, причина в повышенной влажности воздуха или в завышенной доли отвердителя в varnishе. Чтобы избежать такого эффекта, нужно разводить краску строго по инструкции. Убрать оплошность можно шлифовкой и полировкой;
- ground spots or stainsshowing through the paintwork;
- there were drips or stains varnish. This usually happens if the previous paint coat does not dry out or the paint itself is very liquid in composition. Also, the reason may lie in the application process itself, when the spray gun or spray is brought too close. In general, you can remove the drips, as well as the matte effect, but if they are very large, you need to wipe everything and work on the new one;
Scratch Pencil
- fatty stains and silicone residue. To avoid them, before starting work, degrease the surface and treat as much as possible with an anti-silicone compound. Correct the error can be, if you spend painting again;
- the surface did not stain, it happens in hard to reach places. It is corrected only by repainting.
As you can see, some errors are difficult to fix, while others are not at all possible. It should be noted that even the highest quality work done to eliminate scratches on their own, is inferior to service. You need to understand that independent local repairs, only a temporary measure. Of course, the best option would be to cover the bonnet area with a special anti-gravel film or other protective composition. As for the film, it comes in vinyl or polyurethane version. Its layer of 100-200 microns creates a “shield” that protects the car from minor damage for several years.
Other scratch protection options:
- Polishes, depending on the type of polymer, there are Teflon, epoxy and nanopolymer.
- Plastic deflectors, except as reflectors. Mounted usually over the front edge of the hood and over the side windows.
- Liquid formulationsthe same silicate adhesive. Liquid glass invisible layer falls on the paintwork.
- Case fabric based. It usually goes on the hood.


