High-quality car light is the key not only to a good overview at night and in the evening, but also to ensure safety on the road. In such a situation, adjusting the headlamp light with your own hands is an important step during repair or maintenance work on the car. A significant number of complex instruments or tools will not be needed.
Content
- 1 Need for automotive optics
- 2 Preparatory operations
- 3 Used markup
- 4 The first setting option
- 5 The second way to configure
- 6 Configure protivotumanok
The need for automotive optics
All motorists and professionals know that it is allowed to drive a car if it has proper external lighting (low / high beam). With improperly tuned optics, when the set angle of propagation of the beam does not meet the factory requirements, the risk of blinding oncoming drivers with a diffused light beam increases.
Blinding on a highway or in a city road can lead to a traffic accident. Also, the low performance of the odds often leads to emergency collisions.
Check the status and adjust the headlights are those motorists who operate their vehicles on highways with uneven coverage. This is due to the imbalance of fasteners, which leads to the need for periodic adjustment. There are other situations where you need to know how to properly adjust the headlights:
- after installation protivotumanok;
- when a new headlamp was installed or the llamas or reflectors were replaced;
- the adjustment procedures are obligatory after the repair of the damaged front of the car;
- if the whole suspension or its basic elements were repaired;
- when discs or tires were replaced.
If you do not perform the adjustment in a timely manner, this will lead to a further deterioration in the work and a complete imbalance of automotive optics.
Preparatory operations
Experienced specialists do not proceed to the settings without making certain preliminary manipulations with the car and some of its systems. Otherwise, the result will not be at the proper level with possible errors. Then you will have to complete everything not on your own, but go to the car-care center for help.
The preparatory stage is to provide the vehicle with a position corresponding to the standard, which will be as close as possible to that used in the factory. To do this, we carry out the following procedures:
- we take out extraneous things from the luggage compartment, leaving there only a standard set of a motorist, including a jack, first-aid kit, emergency parking sign;
- we ensure the correct positioning of the car by checking the tire pressure value and adjusting it, if necessary, to the parameters recommended by the manufacturer;
- assistants can be involved to speed up the work;
- we clean the outer part of optical devices from mechanical impurities (dust, dirt, etc.), and also use a weakly concentrated solution of the organic composition to remove oil and other grease contaminants;
- Having figured out in the diagram where the adjusting screws of the headlights are located, we pre-wet them with a penetrating fluid to loosen the fasteners in comfort, checking the reliability of fixing the headlights in the planted niche;
- Before starting the settings, you will need to choose a flat platform, located in front of the wall with vertical markings on it.
During adjustment, the driver must be in the cabin or someone similar in size to give the suspension the right position.
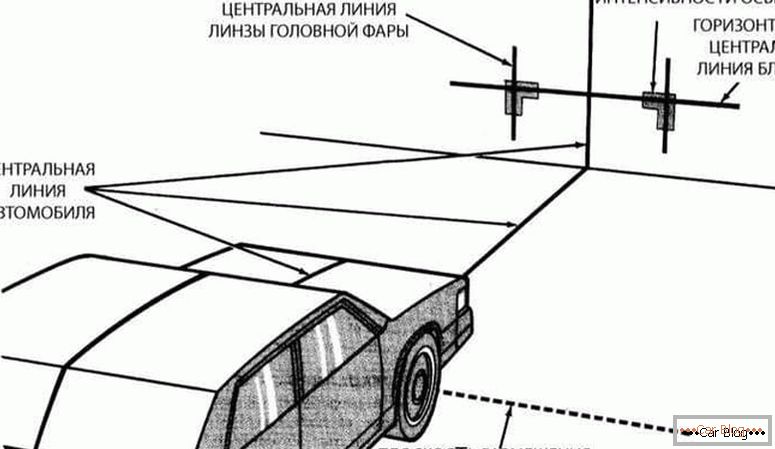
Used markup
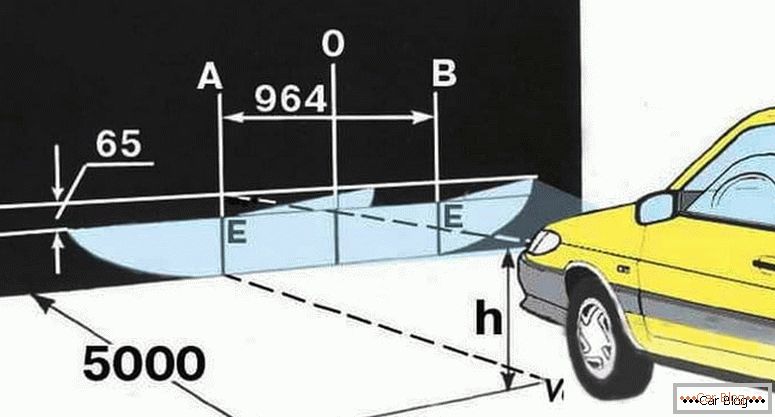
To get the correct tuning pattern on a vertical surface, we approach the free wall in advance to remove 2 meters. Draw on the mark of the center of the machine and similar lines of marks from the lamps on the vertical. The next step requires drawing a horizontal from the road to the line of headlights. Then you need to put a horizontal 5 cm below the previous mark, which will match the position of the lamp from the road surface.
It is important to know that when separate optics are used in the passenger car, measurements are taken for each lamp.
It will be necessary to drive off from the wall at a distance of 7 meters. Select the points that correspond to the optical centers for each of the devices and connect them with lines.
The first setting option
We find a flat area with a nearby wall. We mark up on a vertical surface. At first, the adjustment of the dipped headlights is usually carried out. We unscrew the screws so that the flow is directed to the central horizontal line.
To ensure the direction of flow helps smooth rotation of the screwdriver without sharp axial pressing. All screws are located on the back of the headlights in the engine compartment. It is important to carry out the operation alternately for each headlamp, while blocking the light from the second, closing it with a dense canvas, for example, a sheet of cardboard. Next, go to the second optical device, when it was possible to achieve the redirection of the light beam slightly below the central axis.
The second way to configure
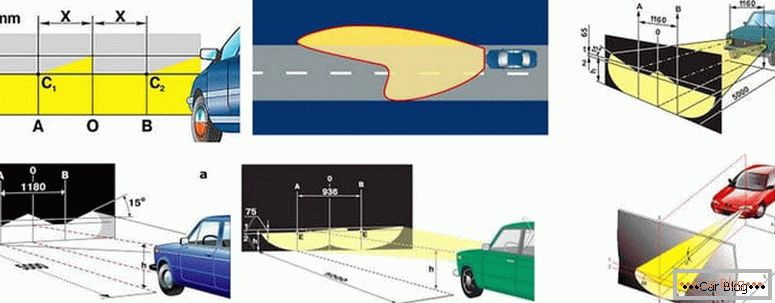
To adjust the high beam headlight adjustment scheme is somewhat different. You will also need a vertical flat surface, but the distance from it will be up to 10 m.
The adjustment for the main beam is carried out in the sequence described:
- the car in full gear is installed on a flat platform directly in front of the wall, where the places of the centers of the headlights are marked;
- We first mark the indicated points and draw a horizontal line 12 cm below the main axis;
- we drive off from a vertical on ten-meter removal;
- set the light to zero;
- we control the light beam, which must come from the head optics and its upper boundary to touch the lower horizontal line.
To understand the correctness of the operations helps the video presented on the page.
Configure protivotumanok
During adjustments, each fog lamp is rotated in a vertical and horizontal axis. At the same time striving to achieve the optimum angle of inclination. For the convenience of work in advance we weaken the locking fasteners.
Step-by-step algorithm of settings consists of the following operations:
- install the car on a flat horizontal surface so that the longitudinal axis of the car is perpendicular to the wall standing vertically
- mark up the adjustment pattern for a particular car on the wall;
- if necessary, we bring the pressure in the tires to the optimum value and drive off at a distance of 5-7 m from the vertical;
- we mark on the wall a horizontal line corresponding to the level of the installed fog light;
- turning on the neighbor, mark on the vertical a zone of a pair of light beams and a center between them;
- switch from low beam to fog;
- if the car is removed at a five-meter distance from the wall, then for ordinary light the inclination of the beam should be 10 cm below the set horizontal, and the fog light should be adjusted in parallel mode without inclination;
- we provide with adjusting screws the center distance for PTF beams of 1.2 m;
- using the markings on the vertical, draw the auto axis from top to bottom and measure from it the distance to the light beams (it should be equal on both sides of the axis).
The subtleties of the adjustment helps to understand the video. It is important to follow the instructions described in the video.


