The brake system is an essential component in ensuring the safety of the car. Modern foreign cars for the most part have front and rear disc brake systems, and brake pads play an important part in them. Having more efficient performance when braking than drum-type brakes, brake pads of this type are subject to more wear. The degree of wear of the brake pads affects not only the magnitude of the stopping distance, but also such an important indicator as a deviation from a straight-line movement, or a skid during an emergency stop. Therefore, timely replacement of the front brake pads ensures the safety of braking.
Content
- 1 When to change brake pads
- 2 Replacing the front brake pads
- 3 Some tips
When to change brake pads
Determining the timing of replacement pads is difficult, it all depends on many indicators: the conditions in which the vehicle is used, used in the manufacture of materials, and most importantly the driving style. For most manufacturers, the mileage at which the front brake pads are being replaced is between 30 and 40 thousand kilometers. But if, with a quiet ride, the pads can be enough for 80 thousand kilometers, then driving in the “igniting style” can shorten their lifespan to 10 thousand.
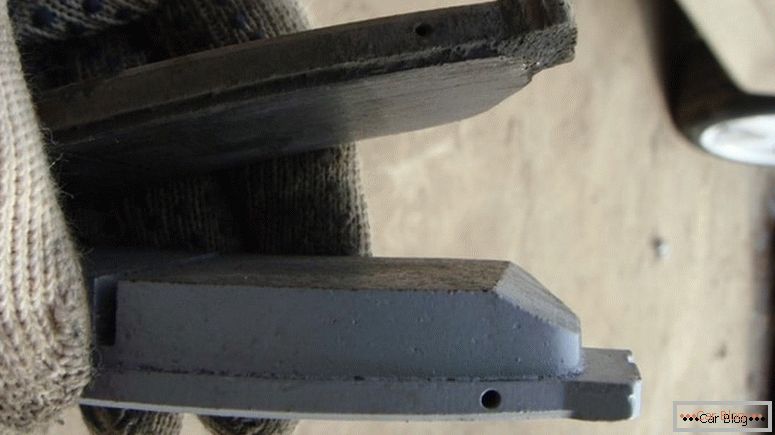
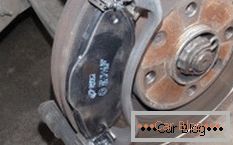
Comparison of the thickness of worn pads and new
Many manufacturers have solved this issue with the help of technical devices telling when to change the brake pads. Their principle is quite simple, with the utmost wear, the metal plate touches the brake disc and an unpleasant squeak appears during braking. Another sign is to drive the car to the side when braking and beating the steering wheel. It is necessary to check the condition of the brakes for each maintenance and if the thickness of at least one friction lining is less than 1.2 mm, then it is time to change the brake pads.
Replacing the front brake pads
This operation will not require any special tools and devices, and it is quite possible to carry out on its own. Before starting work, the car is installed on a flat platform and fixed with the help of a handbrake and recoil devices. We weaken the wheel nuts (bolts), with the help of a jack, hang one side of the car and remove the wheel. For safety, install under the car stops "trestles" or in extreme cases, put the wheel removed. With the aid of a mounting blade or simply a large screwdriver, the pads are pressed to their original position. In this case, the brake fluid will go back to the tank and may overflow, therefore, before replacing the brake pads, it is better to pump out some of the fluid using a medical syringe.
Before lifting the car with a jack, do not forget to tighten the handbrake and put stops under the other wheels.
Next, unscrew the bolt securing the brake caliper to the guide bushings. The caliper is fixed with the help of two bolts, and usually the lower one is turned away. Lift the caliper up and remove the brake pads from the rails. In some cases, it is impossible to squeeze the pads by an amount sufficient to lift the caliper free, this may be hampered by the shoulder formed as a result of the operation on the edge of the brake disc. Also, this collar will interfere with the replacement of the front brake pads, so it is better to remove it. To do this, you need to attach a large file at an angle to the shoulder and untwist the disc using studs or screw in the bolts. This operation should be performed on the inside and outside of the disk.
See also: After how much to change the brake pads of disc and drum brakesBefore replacing the brake pads we inspect them for wear. If they are not worn evenly, it means that the movement of the caliper along the guide bushes is difficult. To eliminate this defect, completely remove the caliper and lubricate the guide bushes with grease. When working, check the smooth running of the brake pistons and the condition of the caliper anthers. Torn anthers should be replaced and ensure smooth running of the brake pistons. The development of piston calipers will require sliding pliers and a spacer that limits the stroke of the piston. This operation is best carried out together. The piston stroke must not exceed twice the thickness of the friction lining.
-

- Jacking up the car, put on the support, remove the wheel
-
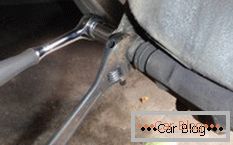
- Turn off the bolt that secures the brake caliper
-
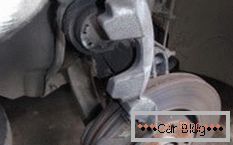
- Fold back the brake caliper and remove the pads
-
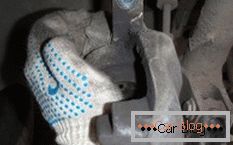
- Fit the piston, do not forget about the brake fluid that can pour out of the tank
-
- Install new brake pads and assemble everything in reverse order.
Brake pad replacement своими руками достаточно проста, закладываем небольшое количество консистентной смазки в направляющие и устанавливаем тормозные колодки. Количество смазки следует ограничить, так как заложенная в большом количестве, она может попасть на трущиеся поверхности и снизить эффективность торможения. Не следует забывать об установке демпферных пластин между металлической основой колодки и поршнем суппорта. Отсутствие этой незначительной детали может привести к образованию неприятного металлического дребезжания. Опускаем суппорт и прикручиваем его на место. Нажимаем на педаль тормоза несколько раз, для установки тормозных колодок в рабочее положение. Устанавливаем колесо, снимаем автомобиль с домкрата и проводим подобную операцию на другой стороне автомобиля.
Some tips
- Change the brake pads at the same time on the entire axis;
- You should not save, branded pads are expensive, but good counterparts will cost only slightly cheaper;
- When deep furrows are found on the brake disc, it is better to replace it with a new one, rather than grind it. Despite the seeming simplicity of the operation, high-precision equipment is required here, because even a deviation of 0.5 mm can cause a strong beating during braking.


 and its work")