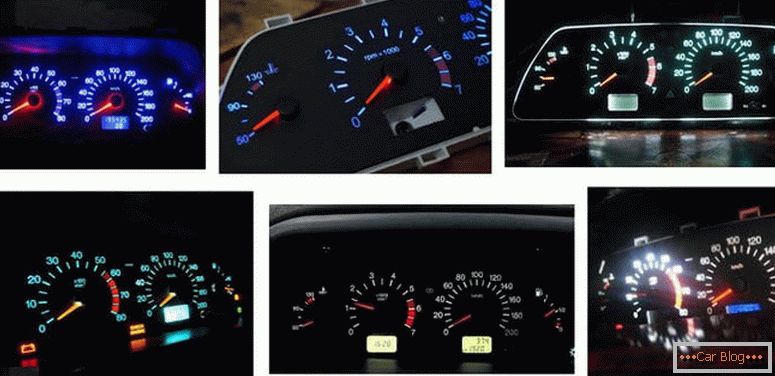
Feedback from the vehicle helps to monitor the current condition of the vehicle. Domestic and foreign designers performed it in the form of light signal indicators. They can be found in abundance, considering, for example, the instrument panel of the VAZ 2114. All the lights are divided into groups and displayed in a certain color.
Content
- 1 Need for dashboard
- 2 Potential problems
- 3 How to disassemble the panel with your own hands
- 4 Interpretation of light symbols
- 5 Installation of new lamps
The need for a dashboard
Depending on how many various vital systems are installed in the vehicle, engineers can divert remote sensing diagnostics from so many elements. It will be easier and faster for the driver to find out about the performance of the car as a whole, if the data is promptly provided directly during the movement.
It is important to understand that sometimes the speed of obtaining information by the driver about the current state of the car on the road can prevent accidents.
Based on the indications of the dashboard, the driver makes decisions about driving. If the instrument panel illumination does not light up, then the module must be restored independently or with third-party assistance. Otherwise, in the conditions of loss of information content, management will be significantly complicated or completely impossible.
Automakers provide their own product with ergonomic and most informative panels. At the same time, a task is provided in which excessive congestion with light icons is not allowed. All of them should be as clear and easy to read.
About how many light bulbs to have in each brand of car, the manufacturer himself decides, as a single standard in this situation was not provided. The main tasks performed by the dashboard are:
- Displays current information on the operation of the engine;
- provides information on the health of important security systems;
- the expediency of using all units in the car is controlled;
- Additional facts are indicated, which include the estimated fuel supply, travel time and mileage, ambient temperature, current time, etc.
A corresponding easy-to-read light icon is selected for each indicator light.
Potential problems
Перед тем how to change the light bulbs on the instrument panel VAZ 2114, стоит знать, что в этой марке автомобиля встречаются определенные сложности, характерные для большинства этих легковушек. С подобными проблемами пользователи могут встречаться спустя непродолжительный период эксплуатации.
Often, the car owner at some point notices that the lights do not work on the dashboard. The factor may be imperceptible for those who use cars during the daytime, but for the drivers operating the car during the night period, this incident is critical. This factor can lead to accidents or provoking an emergency on the road.
See also: The car battery does not charge from the charger - what to do?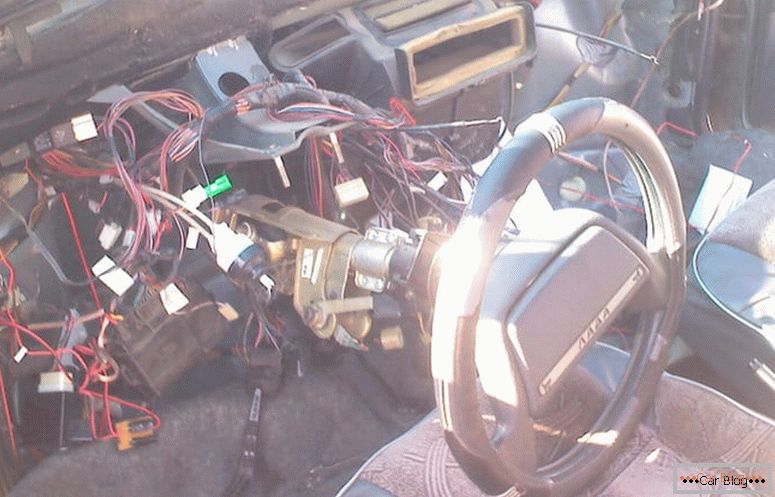
Minimizing the potential threat helps timely replacement of bulbs in the instrument panel VAZ 2114. To perform the operation, you will have to remove the front part of the tidy to successfully get to the right contacts.
How to disassemble the panel with your own hands
For self-dismantling will have to perform some operations in the following sequence:
- First you need a Phillips screwdriver to unscrew the three screws that hold the main bar.
- Next, you will need to perform a similar operation with the following five screws, holding the frame on the vehicle body.
- It is important to fold the negative terminal of the battery, and if there is an audio system, disconnect it from the common cable bundle.
- During the disconnection of the harness we take out the cable responsible for the ashtray's illumination and disconnect the plug from the cigarette lighter.
- Before removing the instrument panel, remove the handles from the levers, a flathead screwdriver or similar disassembly tool helps.
- Slightly ottyanuv the entire plane, remove the handle of the electric fan of the heating module.
- A pair of top and a pair of lower screws should be unscrewed near the instrument cluster.
- At the next stage, get rid of the screws located behind the panel.
- Disconnect the pad, which is fixed by a pair of screws.
- We remove it to the side.
- We recommend each socket of wires to be planned (parted) with similar marks in advance in order to quickly and easily carry out the reverse installation.
- For unscrewing the steering column bracket, you need the key head to "8".
- The LED is fixed with a screw with a Phillips head screwdriver.
- We unscrew the hardware that holds the control unit of the heating system.
- Upon completion of the removal of external attributes should get rid of the decorative insert.
- Then, using the key on 21, unscrew the nut.
- Unscrewing the screws from the attachment points, dismantle the panel.
This method helps to competently and accurately remove the panel at the VAZ, without breaking the fastening parts or latches. For repair the back side will be fully accessible. The assembly is carried out in the reverse order of disassembly.
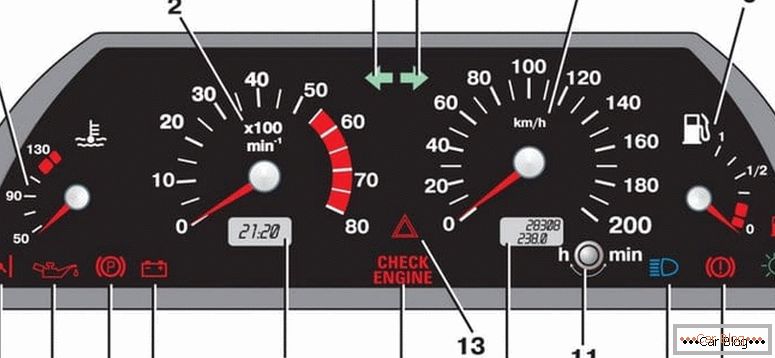
Interpretation of light symbols
In order to properly and timely respond to signals from various automotive systems, it is necessary to know the labeling on the instrument panel of the VAZ 2114. Their unification helps you quickly orient yourself intuitively.
See also: How to properly charge the gel battery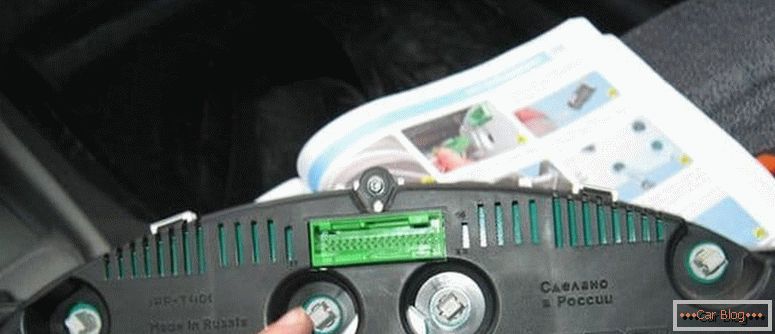
Let us examine the characters and their decoding in more detail:
- Machine with the door open. The light signal lights up when one or more doors are currently open.
- A drop near the canister. The symbol appears with a significant decrease in the level of oil in the engine, when the volume remains less than permissible.
- Fountain and "janitor". The orange indicator lights up when the volume of the washing liquid is reduced to 1 l.
- Thermometer symbol. The orange icon lights up when the coolant level drops in the expansion tank.
- Circle with lateral lines. Problems with the brake system or significant wear pads.
- The crossed-out lamp. It is worth checking the performance of stops or dimensions.
- A pair of arrows at the top of the shield. Light up green after turning on the turn signal in any direction and blinks before turning off the driver.
- The figure fastened by seat belts. The driver or one of the passengers is not fastened.
- Triangle. The red figure blinks after the alarm button is turned on.
- Blue lamp. The icon lights up when switching the headlights to high beam.
- Green lamp. Lights after turning on the low beam.
- Check Engine. The signal appears on the panel in the form of lit when problems with the motor.
- "P". The Latin letter will light up when the handbrake is engaged (raising the parking brake).
- Battery icon. When a rectangle in the form of a battery is burning for a long time, then you should pay attention to the battery or the generator, since there is no charging of the battery.
- Exclamation mark. The icon will be visible if you want to add brake fluid due to a drop in its volume below the level set by the manufacturer.
It should be borne in mind that at the beginning of the launch of the motor all the icons can blink simultaneously. Therefore, the driver will be able to identify areas where you need to replace the light bulb.
Installation of new lamps
For the correct replacement, we act according to the algorithm:
- When a malfunction is detected in any place, we unscrew the cartridge completely.
- You should take into account the direction of rotation, because all threads are right.
- Do not make a significant effort, as it is possible to damage the landing nest.
- We take out the inoperative lamp from the twisted cartridge.
- In the landing slot install a new lamp or LED element with the polarity.
After installing the elements into place, you need to check their performance. To do this, throws pads, connecting with the observance of polarity. If any traces of corrosion or oxidation are visible in the contacts, then we recommend to clean them to ensure better contact.


