A quality car battery is hard to overestimate. However, over time it becomes less capacious and is able to discharge faster. This process is influenced by other factors related to operating conditions. In order not to get into a difficult situation, you should have a simple charger with your own hands at home or in the garage.
In most cases, the schematic diagram of the charger homemade design will be relatively simple. It will be possible to assemble such a device from the improvised low-cost components. In this case, the electric unit will help to quickly start the passenger car. It is preferable to get a start-charging equipment, but it requires a little more power from the elements used.
Content
- 1 Basic useful knowledge of battery charging
- 2 What is the scheme of the car charger
- 2.1 Simplest schemes
- 2.2 Alteration of a computer power supply
- 2.3 Transformer circuit
- 3 Fundamentals of safety in the assembly and operation of schemes
Basic useful knowledge of battery charging
It is necessary to use an electric make-up for batteries in situations where the measurement at the terminals of the electrical device shows a level below 11.2 V for most passenger cars. Although the engine is able to start at this level of voltage, but inside undesirable chemical processes begin. Sulfation and destruction of the plates occur. Capacity noticeably reduced.
It is important to know that during a long wintering or parking a car for several weeks, the charge level drops, therefore it is recommended to monitor this value with a multimeter, and if necessary, to start a self-made charger for car batteries or purchased in an auto shop.
Two types of devices are most often used for charging batteries:
- outstanding on the "crocodiles" voltage constant type;
- systems with pulse type of work.
When charging from a DC device, the value of the charging current is calculated arithmetically corresponding to 1/10 of the capacitance value set by the manufacturer. When a 60A * h battery is available, the return amperage should be at a level of 6 A. Research should be taken into account, according to which a moderate decrease in the number of amperes per recoil contributes to a reduction in sulphation processes.
If the plates are partially become covered with unwanted sulfate bloom, then experienced motorists will use desulphation operations. The applied technique is as follows:
- The battery is discharged until 3–5 V appears on the multimeter after measurement, using large currents for the operation and a short duration of their effect, for example, starter scrolling;
- at the next stage, we slowly fully charge the unit from a single-amp source;
- previous operations are repeated for 7-10 cycles.
A similar principle of operation is involved in the factory charging desulphating devices of the pulse type. In one cycle, a short-term pulse of reverse polarity, alternating with direct polarity, arrives at the battery terminals for several milliseconds.
It is necessary to monitor the state of the device and prevent the battery from overcharging. When the values of 12.8-13.2 V are reached on the contacts, it is necessary to disconnect the system from the make-up. Otherwise, there will be a boiling phenomenon, an increase in the concentration and density of the electrolyte poured inside and the subsequent destruction of the plates. To prevent negative phenomena, the factory electrical circuit of the charger is endowed with electronic control and automatic shutdown boards.
See also: How to replace a low beam bulbWhat is the scheme of the car charger
In the garage, you can use several types of charging for the car. They can be as maximally primitive, consisting of several elements, or rather cumbersome multifunctional stationary devices. Usually car owners take the path of simplification.
Simplest schemes
If there is no factory charger available, and it is necessary to reanimate the battery without delay, then the simplest option will do. It involves limiting resistance in the form of a load and a power source capable of generating 12-25 V.
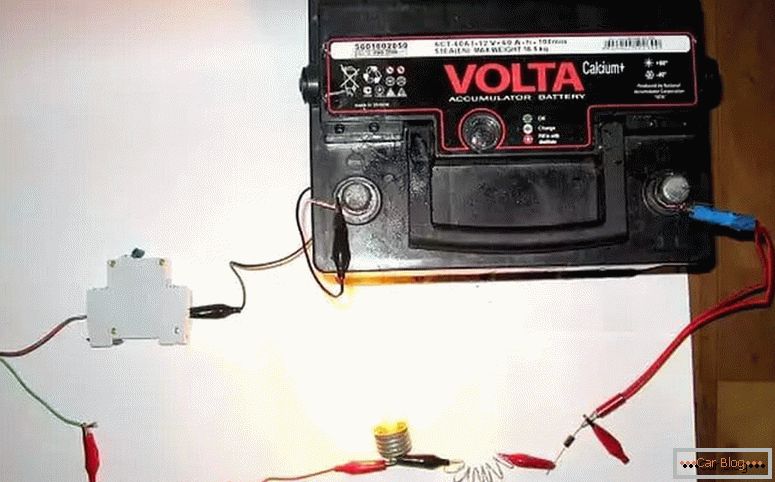
You can even assemble a home-made charger even “on your knees” if there is a charge for a laptop in the house. Usually they give out about 19 V and 2 A. When assembling, polarity should be taken into account:
- external contact - minus;
- internal contact is a plus.
Important! Обязательно должно быть установлено ограничительное сопротивление, в качестве которого нередко используют лампочку из салона.
Unscrewing the lamp from the turn signal or even “stops” is not worth it, since they will become an overload for the circuit. A circuit consists of such interconnected elements: the negative terminal of the notebook unit — a lamp — the negative terminal of a rechargeable battery — the positive terminal of a rechargeable battery — plus a notebook unit. One and a half to two hours is enough for the battery to return to life so long that it will be possible to start the engine from it.
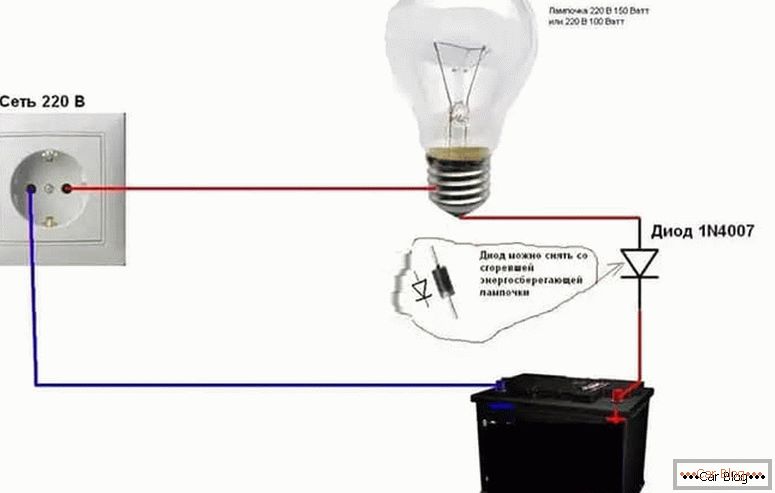
In the absence of laptops or netbooks, we recommend to go in advance to the radio market for a powerful diode, designed for a reverse voltage of more than 1000 V and a current above 3 A. The small dimensions of the part allow you to carry it with you in the glove compartment or trunk in order not to fall into an undesirable position.
You can use such a diode in a self-made scheme. Pre-fold and take out the battery. In the next step, we install a chain of elements: the first contact of the household outlet in the apartment is the negative contact on the diode - the positive contact of the diode - the limiting load - the negative terminal of the battery - plus the battery - the second contact of the household outlet.
The limiting load in this assembly is usually a powerful incandescent lamp. They are preferable to choose from 100 watts. The resulting current can be determined from the school formula:
U * I = Wwhere
- U - voltage, V;
- I - force of current, A;
- W - power, kW.
Based on calculations with a load of 100-watt load and 220-volt voltage, power output is limited to about half an ampere. During the night, the battery will receive about 5 A, which will provide a charging engine. It will be possible to triple the power and at the same time speed up the charging by adding a pair of such lamps to the circuit. You should not overdo it and launch powerful consumers like electric stoves to such a system, since you can disable the diode and the battery.
It is important to know that the assembled direct charge circuit of the car charger with own hands is recommended for use as a last resort, unless there is another way out.
Alteration of computer power supply
Before embarking on experiments with electrical devices, you need to objectively evaluate your own strength in the implementation of the conceived version. After you can proceed to the assembly.
See also: Tensioner belt alternator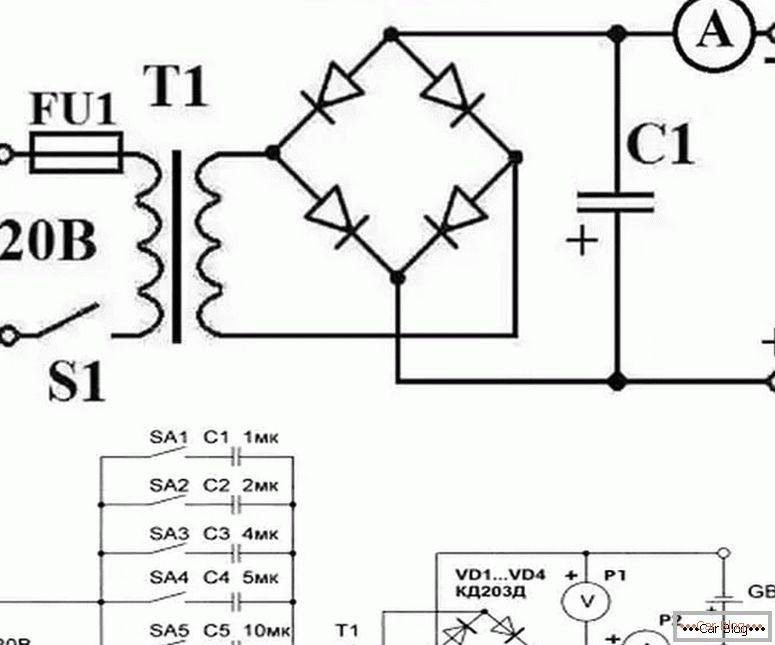
The first is the selection of the material base. Often, for such cases use old computer sistemnik. They take out the power supply. Traditionally they are supplied with conclusions of a different voltage. In addition to five-volt contacts, there are taps to 12 V. The latter are also endowed with a current of 2 A. There are almost enough similar parameters for assembling a circuit with your own hands.
We recommend raising the voltage to 15 V. Often this is done empirically. To adjust the need keloomny resistance. Such a resistor is thrown in parallel with the other existing resistors in the block near the eight-chip chip in the secondary power supply circuit.
Using a similar method, the value of the feedback circuit's transmission coefficient is changed, which affects the output voltage. The method usually provides a rise to 13.5 V, which is enough for simple tasks with a car battery.
On weekends pins tucked-crocodiles. Additional limiting protections do not need to be installed, since there is a limiting electronics inside.
Transformer circuit
Because of its availability, reliability and simplicity, it has long been in demand among experienced drivers. It uses transformers with a secondary winding, issuing 12-18 V. These elements are found in old TVs, tape recorders and other household appliances. From more modern devices can advise waste bespereboyniki. They are available in the secondary market for a small fee.
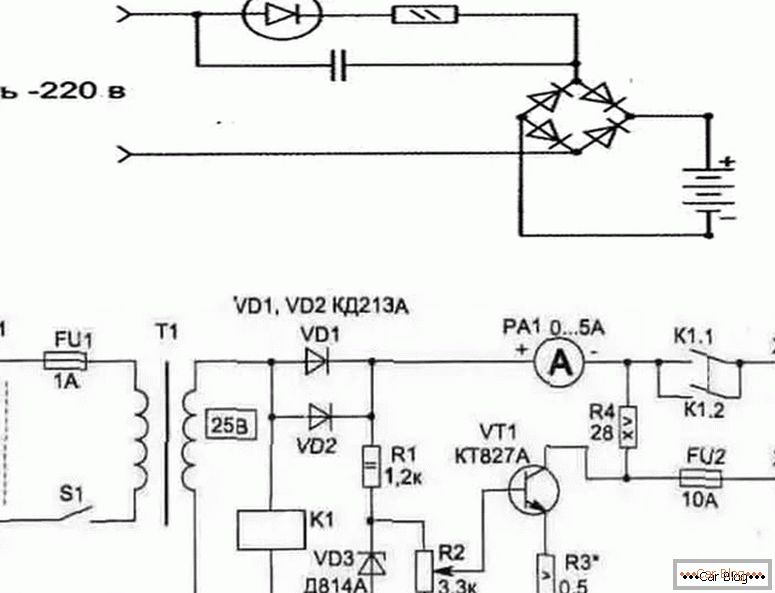
In the most minimalist version of the scheme there is such a set:
- diode rectifying bridge;
- a transformer selected by parameters;
- network protection load calculated accordingly.
Since a large current flows under the limiting load, it overheats from this. To balance the amperage, without allowing the charging current to exceed, a capacitor is added to the circuit. Its place is the primary transformer circuit.
In extreme situations, with a properly calculated volume of the capacitor, you can risk and remove the transformer. However, such a scheme will become unsafe in terms of electric shock.
Optimal can be called a circuit in which there is an adjustment of parameters and limiting the charging current. We present on the page one of the examples.
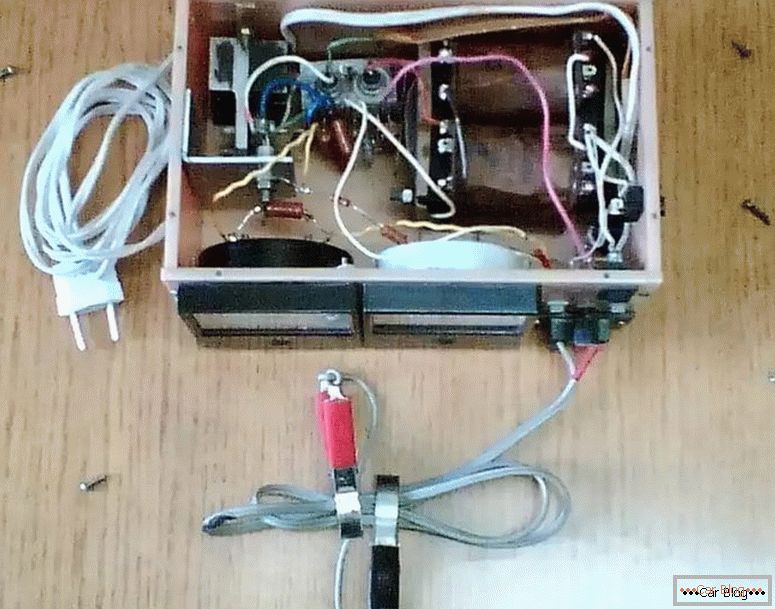
Get a diode bridge will succeed with minimal effort from a failed automotive generator. It is enough to drop it and rewire it if necessary.
Fundamentals of safety in the assembly and operation of schemes
During the work on the configuration of the charger for a car battery should take into account certain factors:
- everything must be installed and installed on the fireproof site;
- when working with straight-through primitive charging devices, you need to equip yourself with means of protection against electric shock: rubber gloves and a rug;
- in the process of charging the battery for the first time home-made devices, it is necessary to monitor the current state of the operating system;
- control points are the current with the voltage at the charge output, the permissible degree of heating of the battery and the charger, preventing the electrolyte from boiling;
- if you leave the equipment for the night, it is important to equip the circuit with a protective shutdown device.
Important! There must always be a powder fire extinguisher nearby to protect against possible spread of fire.

")
