In domestic cars, one of the problem zones is the heating system. It is believed that after a few years of operation, it will be necessary to replace the radiator of the VAZ 2114 stove or model varieties. Proper operation will help restore the performance of this node, ensuring comfortable operation of the machine in any season.
Content
- 1 Heating system operation
- 2 How to change the radiator stove for VAZ 2114
- 3 Solving problems with tap
Heating system operation
In the design of the automobile heater, the following components and components are mandatory elements:
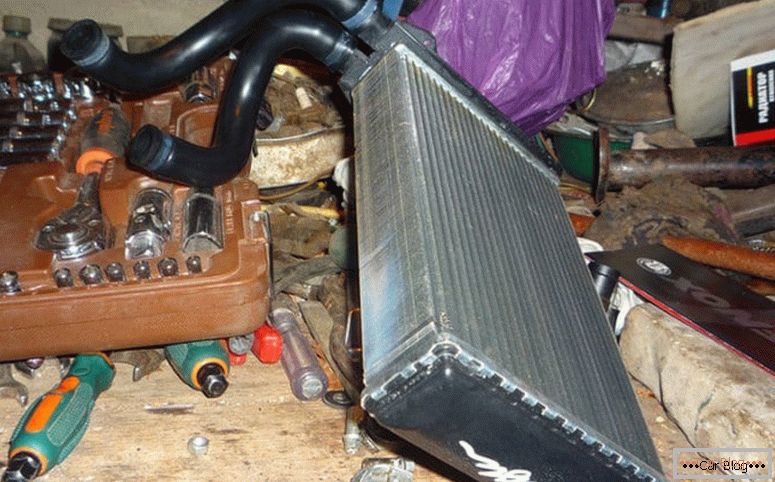
- aluminum, copper or brass radiator;
- a set of pipes;
- bypass tap
It is worth considering that the new models of VAZ cars from the conveyor after 2007 are offered to consumers with a complete set of aluminum radiators.
The circulation of the fluid contained in the system is due to the work of the motor. Motorists should be aware that the heating unit is directly connected to the cooling of the engine. The intensity of circulation is regulated by the built-in faucet. It is he who in VAZs is a “headache” of car owners.
Реже случаются протечки в соединительных патрубках. Обычно теряют герметичность стыковые области или места изгибов. Так how to remove the radiator stove at the WHA 2114 не всегда уместно, то проблему стыков можно на некоторое время решить с помощью замены хомутов. Затянув их покрепче, избавимся от протекания и снижения объема охлаждающей жидкости. Также устраняется мелкая поломка с помощью применения герметика.
Inspecting the area of installation of the radiator helps to identify a place with a leak. Its blocked areas can lead to overheating of the motor. To allow this is not desirable. We test the temperature of the pipes mating with the cylinder block. When some of them are excessively hot, while others have a low temperature, this is a sure sign of a clogging system.
After finding a fault, it will be necessary to replace the radiator of the VAZ 2114 heater or repair it independently or third-party. For dismantling you will need a set:
- set of wrenches;
- vessel for draining coolant;
- screwdriver set or screwdriver with bits;
- new radiator with faucet.
Dismantling works should be carried out with maximum care not to damage the wiring from the tubes.
Как поменять радиатор печки на ВАЗ 2114
The step-by-step instructions for removing and replacing the main heater in a Russian car consist of the following steps:
- We carry out the discharge of the liquid existing in the system. Subsequently, it will need to be fully replaced. We turn away the plastic cap from the central front panel and unscrew the screw with a screwdriver or screwdriver.
- The central panel is released from the mounting screws, while leaving the shield until in its place.
- Unscrew the bottom mount. The operation helps the removal of the steering case.
- In the next step, remove the audio system. The operation is fast and does not cause difficulties. It is only important not to forget to disconnect the plugs. It is necessary to pre-sketch the scheme of their connection, marking the wires in the bundle between them.
- Upon completion of previous operations, access to the plastic console. Unscrew the screws at hand with screws on both sides. Their location for the convenience of installation / disassembly symmetrically.
- We get rid of the fan switch and adjustment flags.
- In this position, the center console becomes accessible to disconnect from the torpedo.
- The next stage is the removal of plugs and terminal buttons.
- We dismantle the diagnostic connector held by screws.
- Freed from the fixture console remove from the cabin.
- We get rid of fasteners on the dashboard on both sides. They are located on a metal frame, where they are unscrewed.
- We release the released metal structure by disassembling the electronic unit. If you slightly raise the front panel in such a position and support it with a wooden bar, you will have access to the desired radiator.
- Fixing the stove in the cabin VAZ 2114 is carried out using clamps. Having weakened them, we will receive a detail.
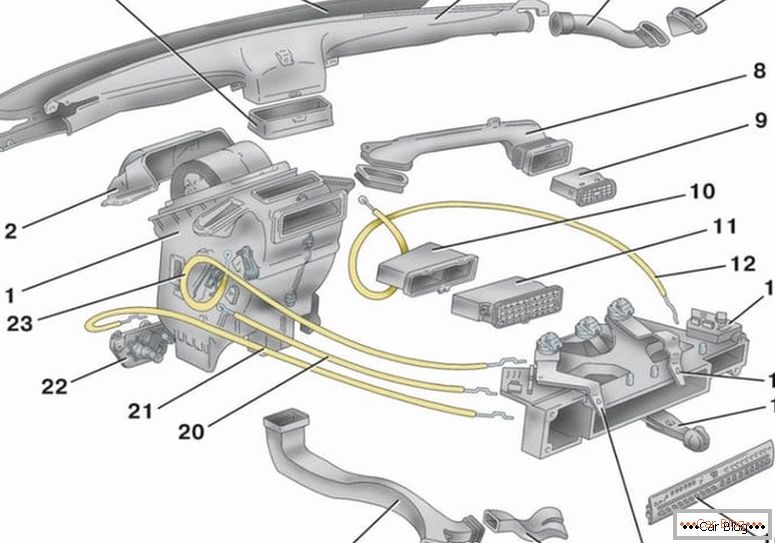
Now you can remove the remaining coolant from the stove and replace it with a new part.
Solving problems with tap
It is important to note that in case of breakdown of the main heater, in the overwhelming majority of cases, the bypass cock fails. On cars VAZ 2114 it is replaced along with the stove. If you do not change stuck faucet, then from loss of tightness due to it antifreeze will flow into the cabin. As a result, an unpleasant odor will appear inside and moisture will appear.
A flashlight will be required for replacement in order to make out small fixing elements and quickly dismantle them.. A visual inspection for diagnosis will be sufficient to identify the installation site.
For work you will need the following set:
- technical aerosol WD-40;
- new faucet;
- cleaning brush to remove scale from metal;
- a set of wrenches and screwdrivers;
- sealant with silicone;
- jack and overpass or observation pit;
- container for collecting antifreeze.
It is preferable to choose a faucet from ceramic models. This will minimize the possibility of oxidation of passageways.
Step by step instructions for replacing the crane:
- We send the car to the inspection pit or on the lift.
- We install an empty container with a wide neck under the place of dismantling, for example, a cut-off plastic five-liter, where antifreeze will flow from the system.
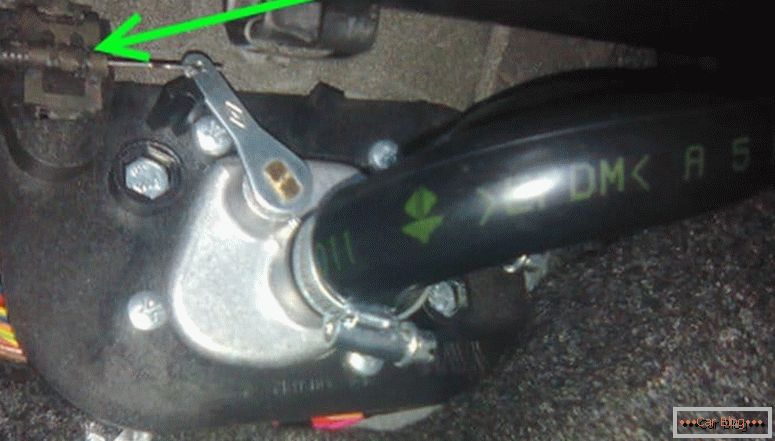
- We get to the faucet during disassembly in the cabin, similar to the operations of dismantling the radiator.
- After draining the fluid, we clean the threads on the heels with a brush for metal. In the process we use liquid WD-40.
- Disassembly of pipes is carried out alternately, because the rest of the coolant will be poured from them.
- At the next stage, work is carried out from the cabin, where the dashboard side trim is removed. To minimize pollution, you should put a cloth on the rubber mat.
- Further, we remove the fixing nuts holding the faucet from the pit with an end wrench for 10.
- We return to the salon, pull the crane towards ourselves, after which access to the cable and retainer on the spring will open, which we also remove.
After all operations, the crane can be dismantled and put a new one. The assembly is carried out in the reverse order of disassembly. We recommend changing all seals to new ones in parallel. It is worth using a sealant to ensure maximum sealing.


