For a start it is worth noting that the wrong connection of the car radio can lead to poor-quality sound of weak power or damage to the speaker system. If such a warning does not frighten you and there is a great desire to do everything yourself, then we will try to understand this issue together and understand how to install the car radio correctly. To perform the work you will need electrical tape, a tester and a screwdriver. By the time the entire installation process can take from 5 minutes to several hours. The following recommendations are applicable in 85% of cases of assembling a radio tape recorder.
Content
- 1 Installation Features
- 2 Marking and color marking of wires
- 3 How to connect the car radio
- 4 Speaker connection
- 5 Wiring diagram radio
- 6 Antenna connection
Installation Features
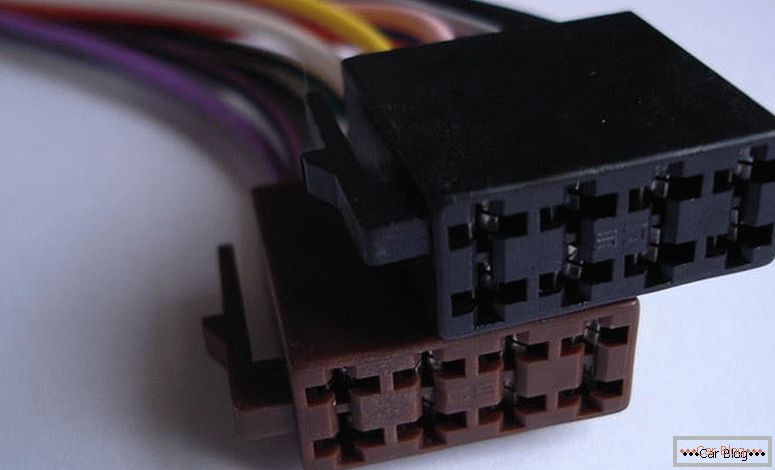
Standard ISO connector of modern tape recorder
The car has several options for completing special connectors and conductors for the installation of the audio system:
- The conductors in the car are brought to the rear and front speakers, while the power wires come from the battery, and the positive cable is equipped with a separate fuse. The wires are connected to a special connector that is identical to the socket in the radio. The cord from the antenna is also removed and is suitable for the installed audio system.
- All the necessary wires for mounting are connected and connected to the connector, however, the plug does not fit into the car stereo jack.
- In the car there are no conductors for the loudspeakers, and the power wires are not connected. Also, the wires may be available, however, are incorrectly connected.
We will not dwell on the first variant, since everything is clear and you just need to connect the existing power wires and insert the connector. In any case, it is necessary to check whether everything is ready for the new audio system and make sure that the wiring and speakers correspond to the output power of the radio.
Consider in detail the second option, when the wiring connector of the car does not match the audio jack. The problem is that almost every company installs on their receivers individual types of connectors for connection. Different models of the same manufacturer may have completely different outputs. In this case, most often the car stereo comes with a separate adapter to the ISO standard.
Before you take any action to resolve the problem, you must finally make sure that the adapter is not included or does not fit. One can get out of such a difficult situation in two ways:
- The correct and reliable option would be to purchase an ISO adapter for electrical wiring of the car. There will definitely be no problems with search and acquisition, as there are a great many on the market now;
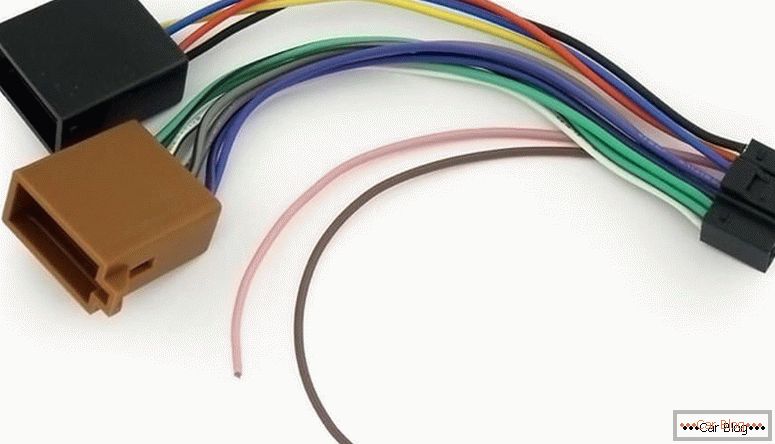
Similar ISO-adapter is on sale in any autoacoustic stores
- This method is undesirable and not the best, however, as practice shows, it is very common among technical centers and motorists. It involves removing the connectors and twisting the wires directly. For a start it is worth making sure that the wires from the radio tape recorder match in color with certain wires on the car connector. If everything is normal and they are identical, then the battery should be disconnected and then the connector of the car and the audio system should be disconnected with pliers.
To prevent confusion, connect the connector to the radio and bite off the rest. The wiring of the audio system and the car is carried out in accordance with the color marking. It is best to dissolve the joints, and then isolate them with the help of heat-shrink cambric.
In the case when the colors of the wires are different and do not match, you will need to make their dial and, most likely, you will need to run the missing wires. To perform this action, you should arm yourself with a tester or a special multimeter with a beeper and a separate 9 volt battery.
Attention! Any manipulation of the wiring is carried out only when the battery is disconnected!
We will not dwell on the process of dialing with a multimeter. Consider why you need a battery and how it is applied.
If you ring the loudspeakers and do not disconnect the wires from them, two wires should ring. This will be a pair for a specific speaker. It is to determine their polarity need a battery. It connects to a pair of wires, and then you need to monitor the movement of the speaker cone.
If the diffuser moves outwards, then the polarity is correct. The wire that was connected to the plus of the battery is marked as “+”, and to the minus - “-”. If the diffuser is involved, then the polarity is selected incorrectly and it is necessary to mark the wires the opposite. The battery connects to the speaker for just one second.
Marking and color marking of wires
Installing a car radio with your own hands will require knowledge of wire marking:
- Black (denoted GROUND or GND). Minus battery;
- Red (mark ACCC or A +). Plus ignition;
- Yellow (indicated by BAT or B +). Plus from the battery;
- White with stripe (labeled FL-). Minus front left speaker;
- White without strip (indicated by FL +). Plus front left speaker;
- Gray with a stripe (labeled FR-). Minus right front speaker;
- Gray without strip (denoted by FR +). Plus the right front speaker;
- Green with a stripe (labeled RL-). Minus left rear speaker;
- Green without strip (designation RL +). Plus a left rear speaker;
- Purple with stripe (labeled RR-). Minus right rear speaker;
- Purple without strip (designation RR +). Plus the right rear speaker.
In addition to the main wires, the audio system can also have additional ones, say blue with a white stripe or without a stripe, which is designed to connect the antenna, orange - to turn on the backlight and others.
How to connect the car radio
Consider in detail the option when installing and connecting an audio system needs to be done from scratch. At the first stage it is necessary to buy a complete set of wires for connecting the loudspeakers and power. The length of the wires depends on the features of the car and the chosen method of installation. Best of all, when they are as short as possible and do not have additional twists. A good solution would be to purchase copper stranded wires having silicone insulation. Their thickness should be sufficient to ensure the most efficient operation of the audio system. Power wires with a section of 4 mm. sq. suitable for car stereo power up to 120 watts. In this case, the wires on the speakers with a cross section of 1-2 mm. sq. quite enough.

Positive power wire must have a thickness of at least 4 sq. Mm. and be fused
Often in one set with loudspeakers there are connecting wires that do not match the required thickness.
Speaker connection
Modern audio systems are most often designed for servicing 4 speakers. These are two rear loudspeakers and two front speakers. Receivers delivering 30 watts of power or more per channel have four pairs of wires. Each pair has its own color marking. Also in each bundle there is a wire without a strip (plus) and with a strip (minus).
Do not confuse polarity, although it is not so bad. It is strictly forbidden to ground a wire with a stripe (minus) that goes from the radio tape recorder to ground, since it has absolutely no relation to the total mass of the car. The loudspeakers themselves are equipped with two terminals (one narrow, the other wide). Receivers of weak power can have only one positive wire for each speaker. In such a situation, the negative of the speakers must be connected to the general negative of the audio system. The positive wire from the car radio is attached to the wide terminal and the negative wire to the narrow one.
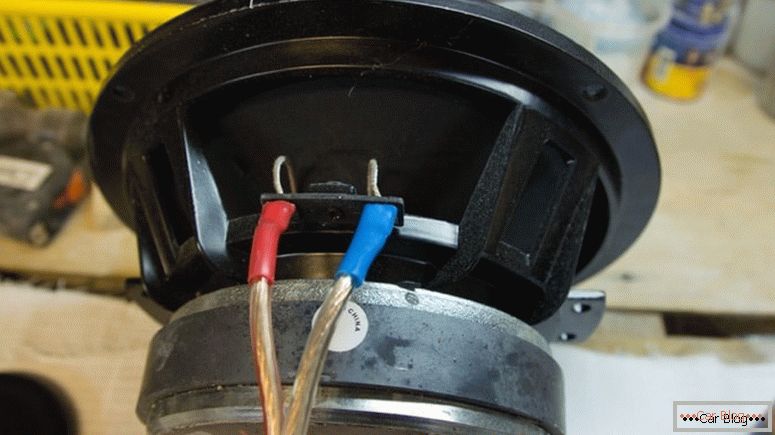
When connecting the speakers, observe the polarity, this will allow for better sound
Proper phasing should be given special attention. If the connection of pros and cons is correctly made, then we can expect that no problems will arise, and the audio system will work properly. In this case, a situation may arise when the sound quality does not meet the required expectations. There is sound, the volume is excellent, however, the low frequencies are practically not felt, and the increase in bass changes absolutely nothing.
The circumstances described are a sign of improper phasing. It will be necessary to very carefully check the connecting wires, and in those places where necessary, reconnect them.
There is another easier way to track the correct phasing:
- Sound needs to be transferred completely to the front speakers, and then set the balance to one speaker, for example, to the right one. The volume should be increased to maximum performance or until the appearance of noticeable distortion.
- Next, the balance should be transferred to the middle position, thereby distributing the volume evenly between the left and right speakers. If the phasing is done correctly, the overall volume will increase significantly. A slight increase in volume, the absence of its increase or the complete disappearance of low frequencies indicates incorrect phasing. Then you need to swap the wires on the same speaker. The same procedure should be repeated on the back row of the speakers.
Radio connection diagram
Virtually all modern car stereos use three wires of yellow, red and black for power supply. Negative battery corresponds to the black wire. Yellow is a battery plus and feeds power consumers. If for certain reasons the yellow wire has deteriorated, it is necessary to completely change it to a new corresponding section. The red wire is a plus of the ignition lock.
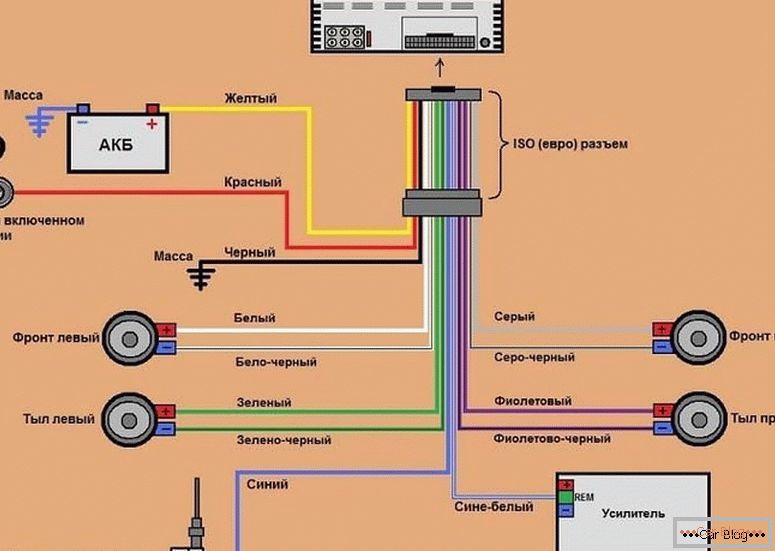
Detailed connection diagram of the car radio
First you need to understand the connection of black and yellow wires. Many motorists connect the black wire to the first free bolt to ground, and the yellow wire connects from the ignition switch or cigarette lighter. In fact, this method is wrong.
By connecting these wires to the battery, you can get high-quality sound of high power. The wires themselves are best to take stranded, copper thickness of 4 square meters. mm Having retreated 30-40 cm, a fuse for 10-20 A is installed on the yellow wire with good insulation. The red wire also has a positive meaning, however, it is required to be connected with the ignition lock. And to be extremely precise, it connects to a circuit that is energized at the position of the ACC key.
It happens that motorists connect together the yellow and red wire. The advantage of such actions is that the audio system is constantly working and does not depend on switching on or off the ignition. Of course, the disadvantage in this case is that the radio is always in standby mode. This will affect battery performance. The discharge rate of the battery will increase. This figure depends on each individual radio, therefore, specifically calculate how quickly the battery will be planted quite problematic.
Antenna connection
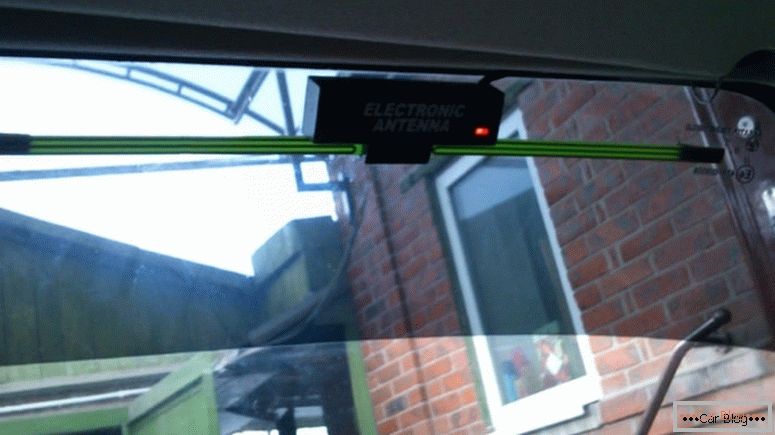
Appearance of an active internal car antenna
The antenna is passive and active. Connecting a passive antenna is easy. To do this, you just need to insert the plug into the appropriate slot. But with the installation of the active antenna, you need to work a little, because it needs to be powered up. Most modern car receivers have a special output. It is a blue wire with or without a white stripe, which has the designation REM, ANT or AMP. There are sometimes two such wires. They are responsible for turning on instruments that work only when the audio system is in use. In our example, it is the antenna that is such a device.
The question raised is how to connect the radio, and the direction of car audio is not just the topic of a separate article. In fact, it is a whole science, for the study of which there is a huge amount of manuals, information and books. In the proposed article we tried to focus only on the most important aspects and details of the installation of the audio system.


