Fully equipped car is the key to safe operation. However, some car companies do not consider the main options, excluding them from the basic configuration. These attributes include fog optics. Motorists introduce it independently, acquiring the necessary kit separately. For installation in such a case, the connection diagram of the protivotumanok through the relay is used.
Content
- 1 The relevance of the use of additional optics
- 2 Current requirements for installation of additional optics
- 3 Popular connection options PTF
- 4 Optimal wiring diagram
The relevance of the use of additional optics
Experienced drivers know how sometimes it is problematic to overcome some parts of the route in bad weather. High or low beam reflected from airborne particles of moisture. The settling fog significantly reduces the level of visibility on the way.
Improve visibility is possible by lowering the height of the light beam. To do this, mounted additional lights - fog lights. They are located closer to the asphalt surface, where there is a lower density of wet particles, and the beam is able to reach distant sections of the route.
The advantages of such devices are the following factors:
- provides a significant improvement in visibility for the driver;
- a car equipped with foglights can be seen from a further distance;
- the kit has a relatively low price tag;
- If necessary, the equipment can be mounted independently.
It is preferable to install fog lights from well-known brands or proven manufacturers to get a guaranteed high-quality result.
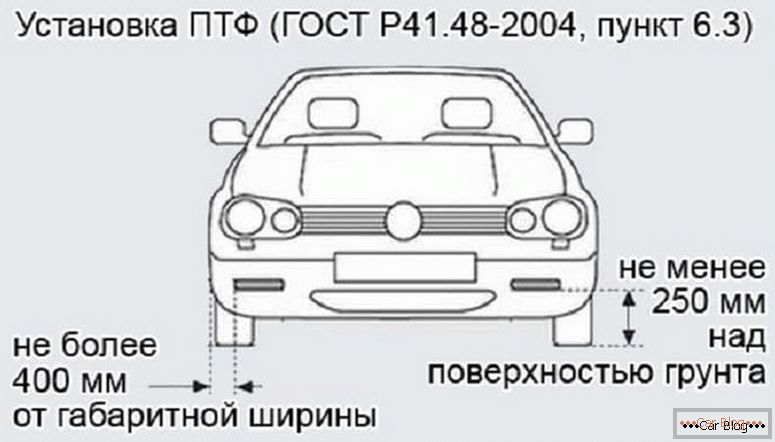
Current requirements for installation of additional optics
Rules for the installation of fog lights are regulated by the current traffic rules. Also, this should comply with GOST 8769-75. Otherwise, you can get problems with the traffic police.
Before installation, you should familiarize yourself with the installation regulations:
- the maximum deviation from the side of the car to the edge of the headlamp should not exceed 0.4 m;
- from the bottom of the installed device to the road surface there must be a gap of at least 25 cm;
- the visibility angles at which the optics will not be blocked should be provided: in the vertical plane + 15–10 degrees, in the horizontal plane + 45–10 degrees.
The inclusion of protivotumanok should be provided simultaneously with the launch of tail lights.
In the design of modern cars, most manufacturers provide the ability to install such additional lighting. Under it stand out special modules in the front of the car. Identify such areas will be able to special plugs installed in the front bumper. It is enough to remove each of the plugs to begin the installation of lighting devices.
See also: What is parking sensorsIf the manufacturer has not planned a place for PTF in the design of the car, then each motorist can independently choose a place for them. In this case, you will need to adhere to the established norms and rules of installation. This is connected not only with the observance of legality, which is important, but also with ensuring the high performance of the new headlights.
После того how to connect the fog through the relay удастся в полной мере, важно будет провести их регулировку с фиксацией на установленных позициях. В таком случае потребуется добиться правильных углов падения светового потока.
Popular connection options PTF
It is assumed that one of the connection methods can be applied in different machines. One of the simplest methods is the method in which the installed cabling from the manufacturer of the car is used. There are already standard connectors and well-fixed wiring harnesses that supply power, etc. to the plug-in headlamps.
A motorist needs to properly fix the optics through the mounting holes provided by the manufacturer and connect the wires. Such retrofitting is the most popular, fast and affordable, even in garage conditions.
When there is no cabling for protivotumanok in the vehicle, then a pre-measured number of insulated cables will need to be purchased with the optics kit. It is advisable to take them colored and with mounting connectors. This will greatly simplify the work. You will also need to stock up on the relay and fuses.
It is important not to make mistakes and not to install the PTF on the wires intended for the parking lights, as the plant does not provide for the use of these cables with excess current consumption.
A mandatory element is a built-in fuse. He is a lifeguard from possible short circuits or from fire. The nominal value is selected, based on the value of the power of the new optics.
The method of calculation is the following formula:
P * 2 / V = I, where
- P is the power of one headlight, W;
- V is the voltage in the automotive network, which is usually 12 V;
- I - the calculated value of the current for the fuse, A.
If you chose headlights of 40 watts, then we end up with a current of 40 * 2/12 = 6.7 A. In any case, it is preferable to choose fuses with a good margin of 30–50%. Accordingly, you need to put in the example plug on 10 A.
Optimal wiring diagram
A simple connection is made through the switch directly from the battery. A pair of power contacts is output from each headlamp. One of them is diverted from each headlamp and connected to each other. Next, look for the nearest part of the metal car body, performing the role of "mass" (minus contact), fix on it a bolt stripped wire from the headlights.
You can also perform a “minus” summation from the battery, which will be more reliable.. With this option, the car owner subsequently insured against possible corrosion of the body and poor contact.
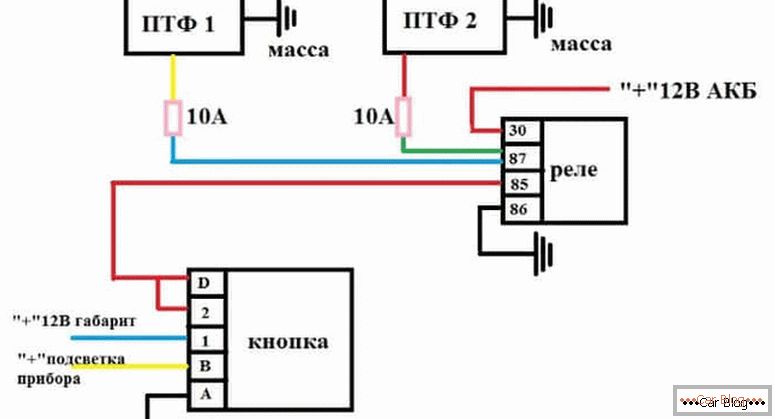
The remaining taps from the headlights are connected to the positive wires from the battery. For convenience and reduction of cabling, the second pair from both headlights is also interconnected. Connecting the PTF through the relay and the button assumes the output of a “plus” on the relay marked “87” Subsequent contacts are connected as follows:
- "30" is displayed to the fuse, and then to "+" on the battery;
- "86" is joined to the "mass" on the car body or to the "-" on the battery;
- "85" is taken to lead to the positive battery, interrupted by a switch that is involved in the contact circuit "30".
If there is no free button on the instrument panel, you will have to mount it in a convenient place. In some cases, drivers put it between the front seats so as not to remove the panel.
A more complicated installation option is possible, which involves connecting cables in the ignition system. When you turn the key, fog lights will start immediately, and when you turn off the ignition, everything turns off. This technique eliminates the option in which the driver can forget to turn off the PTF.


